Julius Caesar
The Lawrenceville School, February 2025
Director: Matthew Campbell
Scenic Design: Matthew Campbell
Costume Design: Vanessa Giannikas
Lighting Designer: Anton Popowitz
Technical Director: Jared Goldenberg
As a high school junior, I was the lighting designer for The Lawrenceville School’s production of Julius Caesar. This was my first design in-the-round and I encountered some new challenges. For example, how do I light a stage, which is only 8 feet wide, without spilling too much light onto the audience? I was the sole student on the design team.
I wrote an article for the school paper about my lighting design experience. To read it, click here.
To see my final lighting plot, click here.
To see my hand-drawn draft lighting plots, click here.
This production taught me how to design in unconventional spaces, turning an odd stage into a psychologically rich environment. Here are three of the design tools I used:
Things To Note
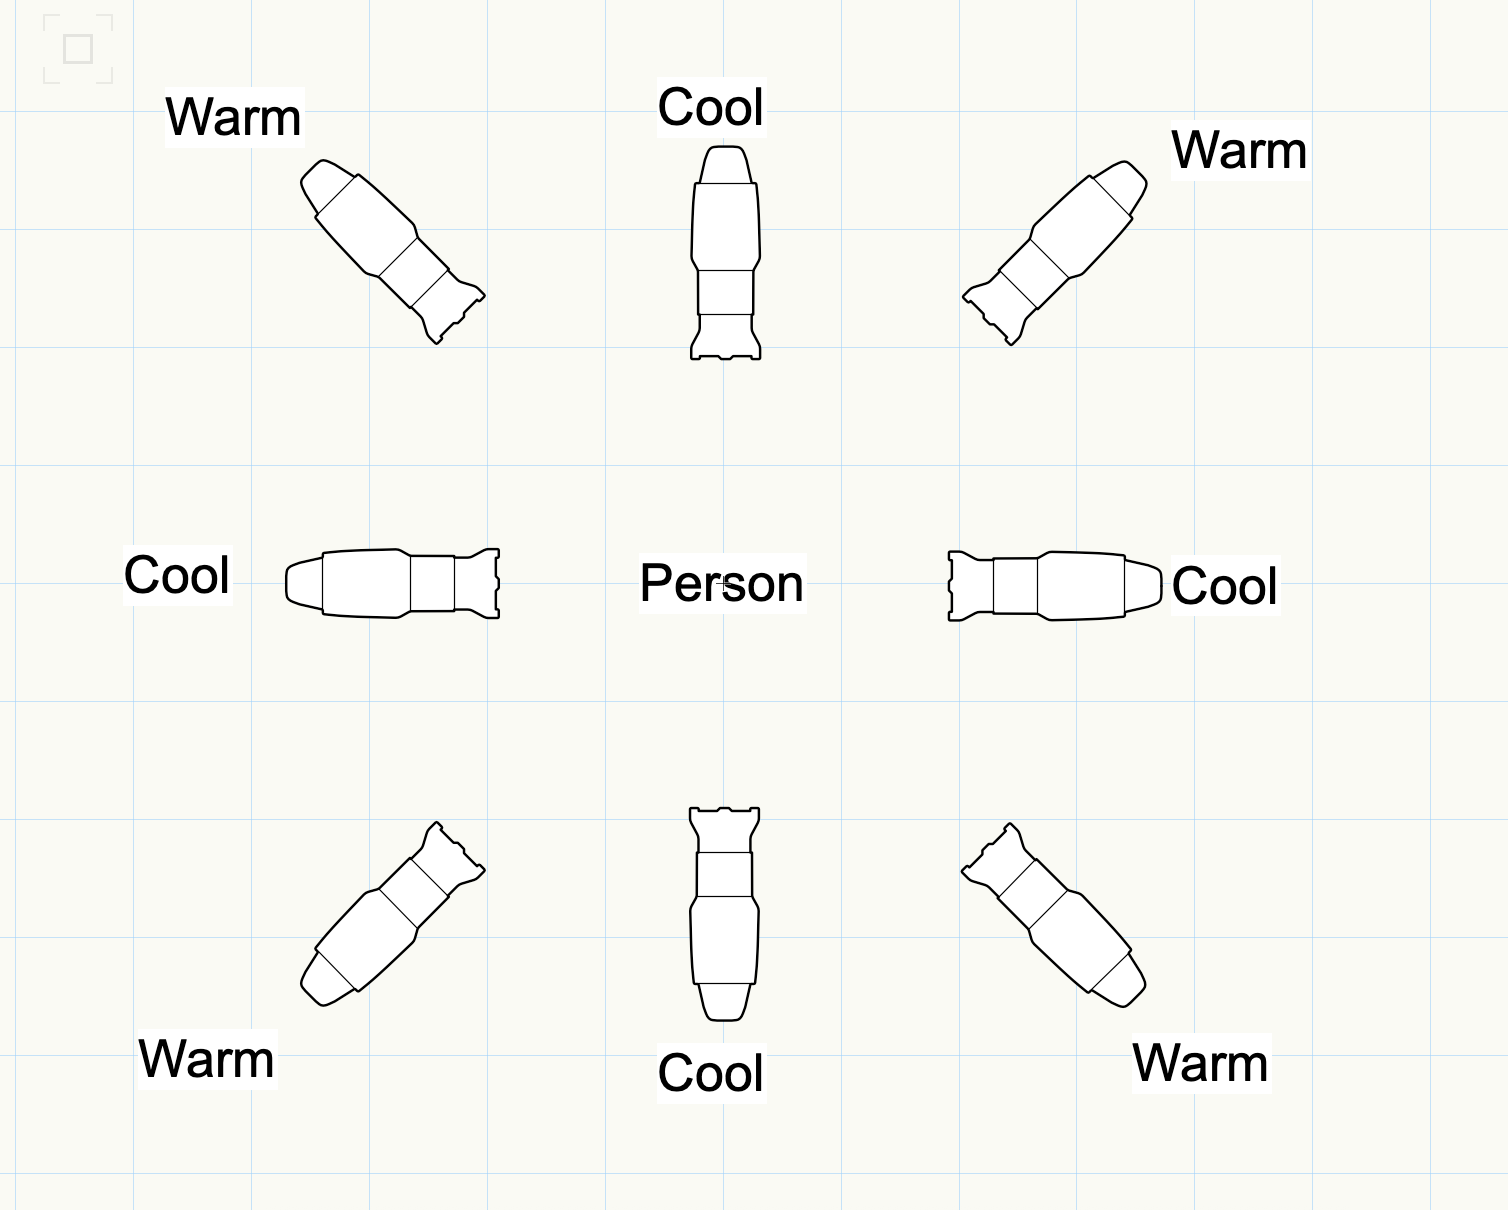
I wanted to use a McCandless front light system for maximum flexibility while keeping the number of lights used to a minimum. I adapted the classic McCandless style in order to make it work for this in-the-round production. A diagram of my adapted version is shown below. I positioned the warm lights (L206) at a 30° face angle and the cool lights (L201) at 60° face angle. This arrangement allowed me to create nighttime scenes with an eerie and uncanny quality, achieved through the shadows cast under the actors' eyes by the steeper-angled cool lights. When I wanted to reduce that unsettling effect, I would fill in the shadows with the shallower-angled warm lights.
Front Light
I created the haze for the show using two machines with different fluids. A Chauvet Geyser, filled with UNIQUE haze fluid, produced a large-particulate haze that, due to the unit's high heat, rose in swirling clouds. A Rosco V-Hazer, using V-Hazer fluid, offered a more even, ambient effect. I directed both hazers through a box fan to better control dispersion. This particular production of Julius Caesar aimed to highlight the desolate world of Caesar’s Rome, and the haze helped evoke a sense of ruin, loss, and barrenness. I designed the lighting so that beams of light shone through the suspended haze, creating a ghostly, fractured environment that mirrored the emotional and political decay unfolding onstage.
Haze

I used eight Chroma-Q Color Force 72s directly above the stage in a continuous line running tip-to-tip. Instead of programming them as a basic top wash, I used pixel mapping in EOS to animate across the fixtures as a single, unified surface. This allowed me to dynamically follow the on-stage action , using subtle wave effects for tension and jagged pulses during conflict. Because the lights spanned the full length of the stage, they functioned like a digital ceiling, giving me more control as a designer. The pixel effects helped unify the space and added a layer of scenery without needing additional set pieces. They also gave me a way to add texture to the space without using gobos.
Pixel Maps


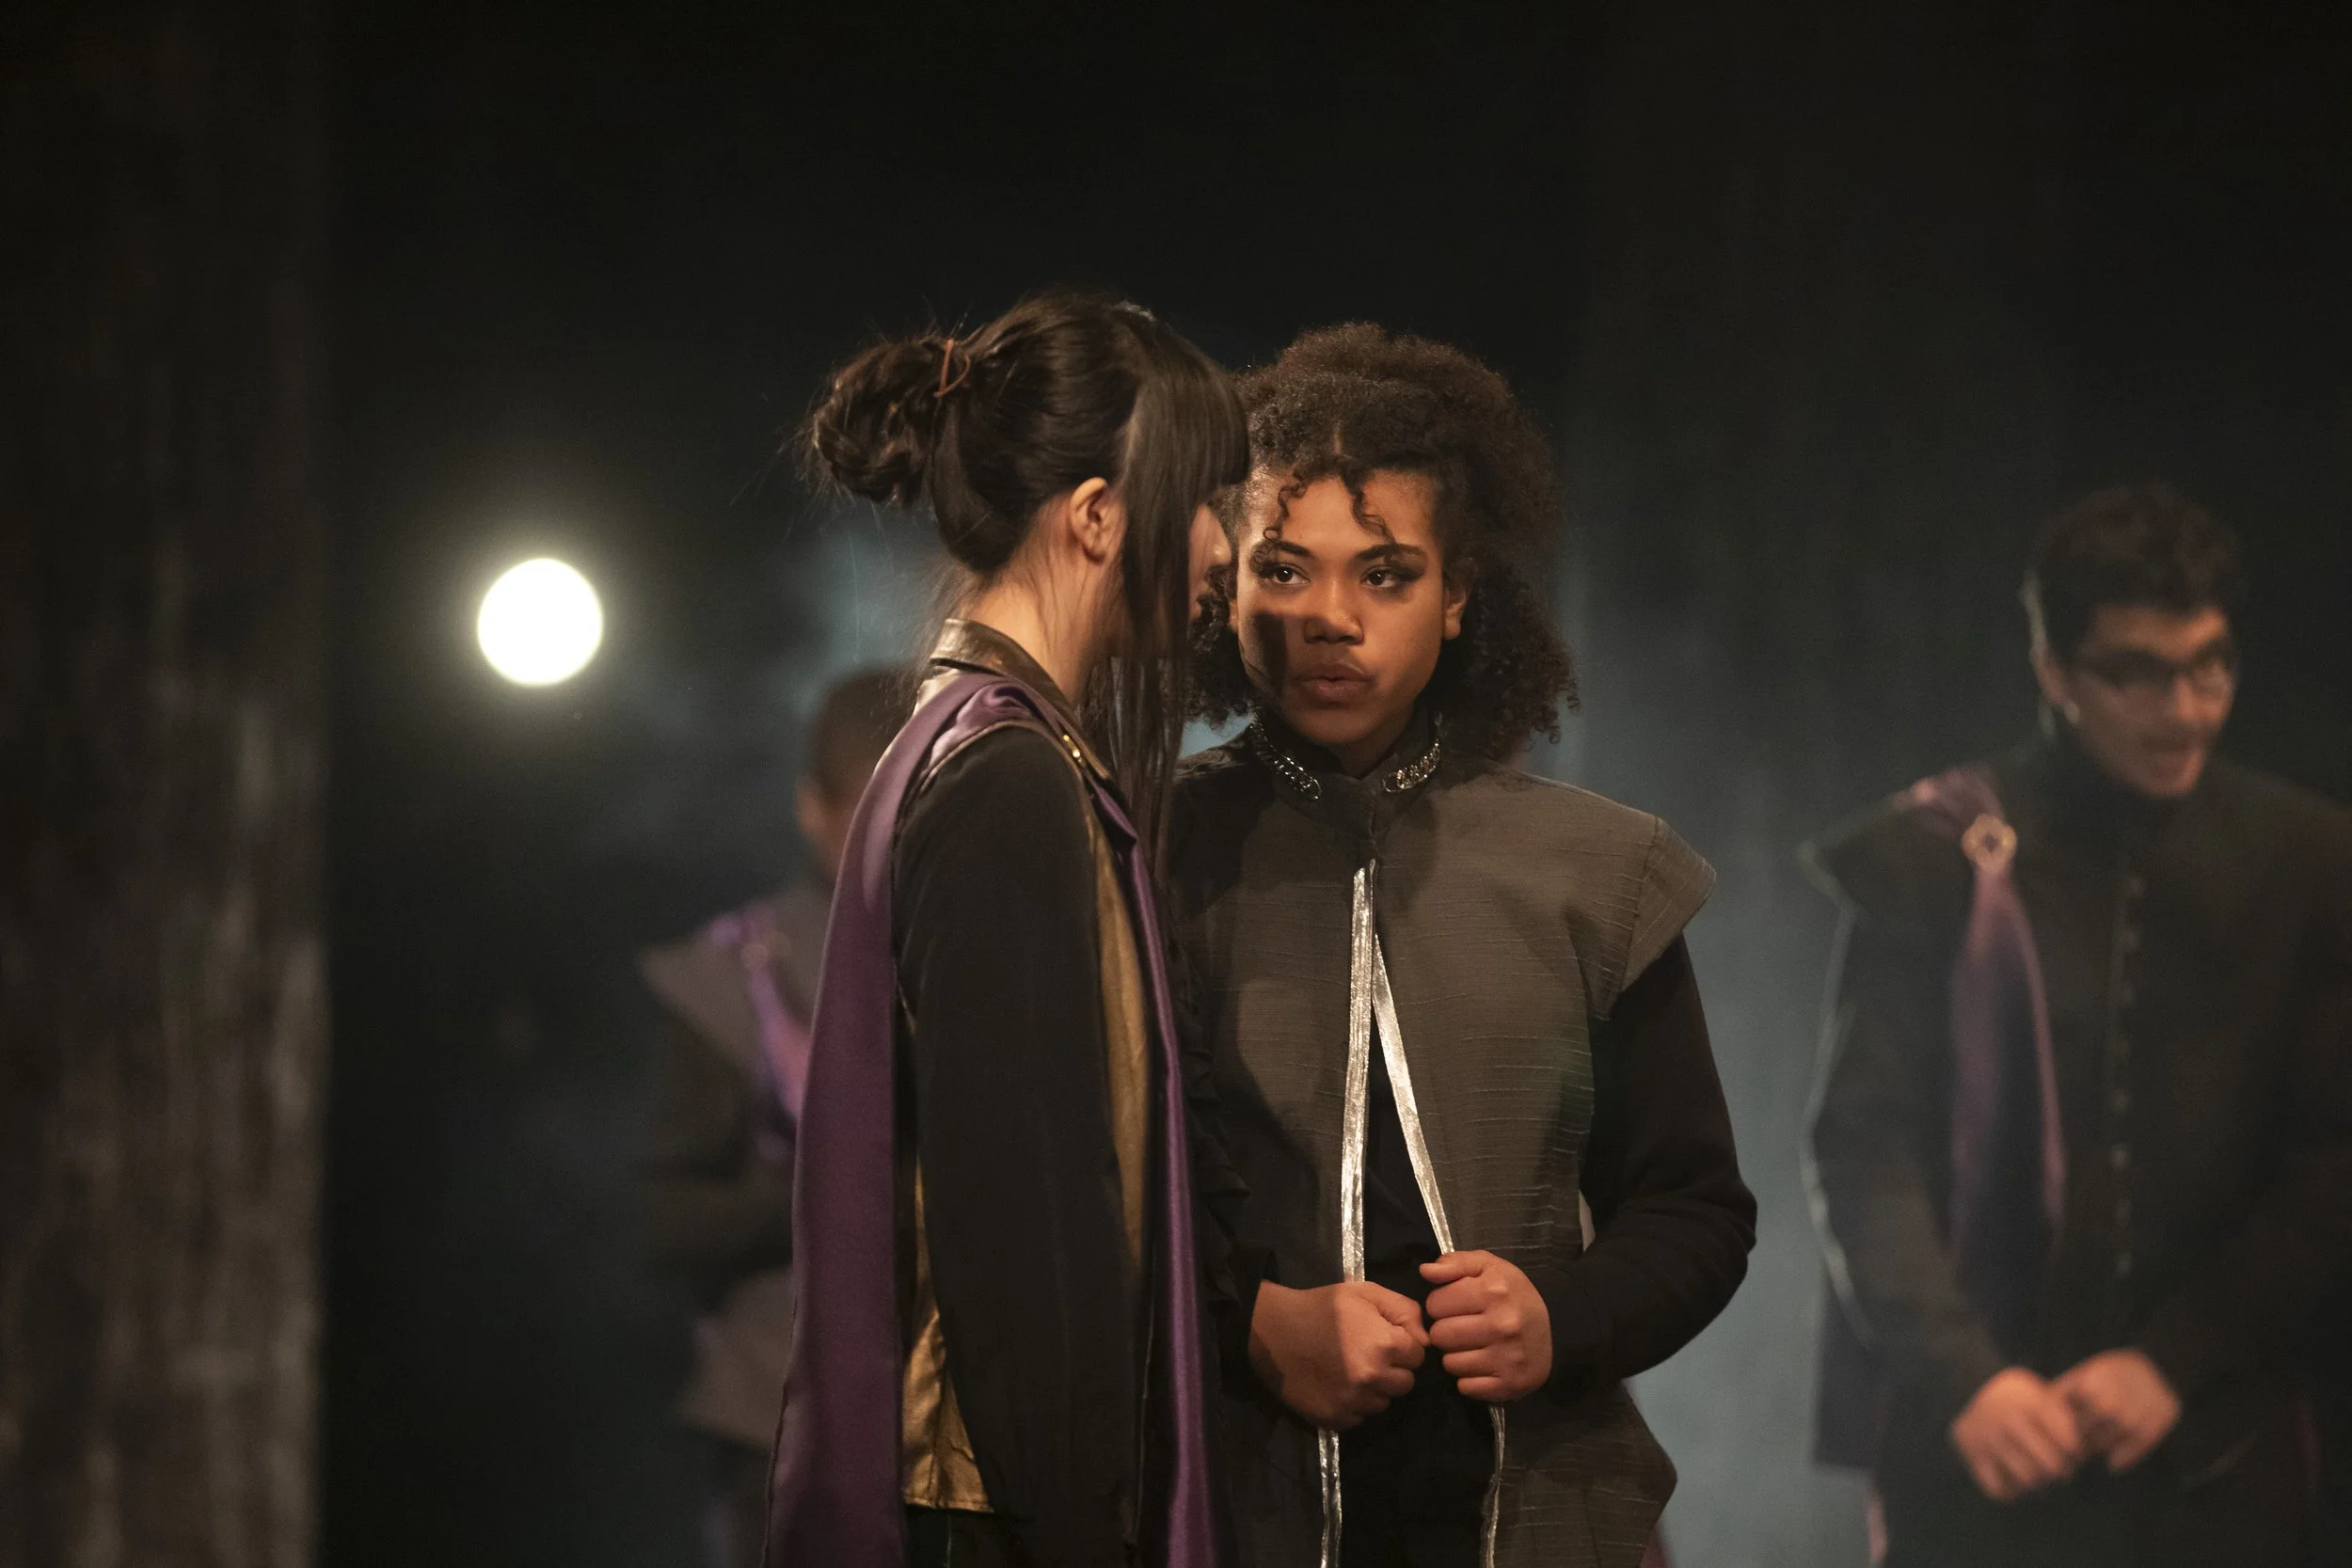
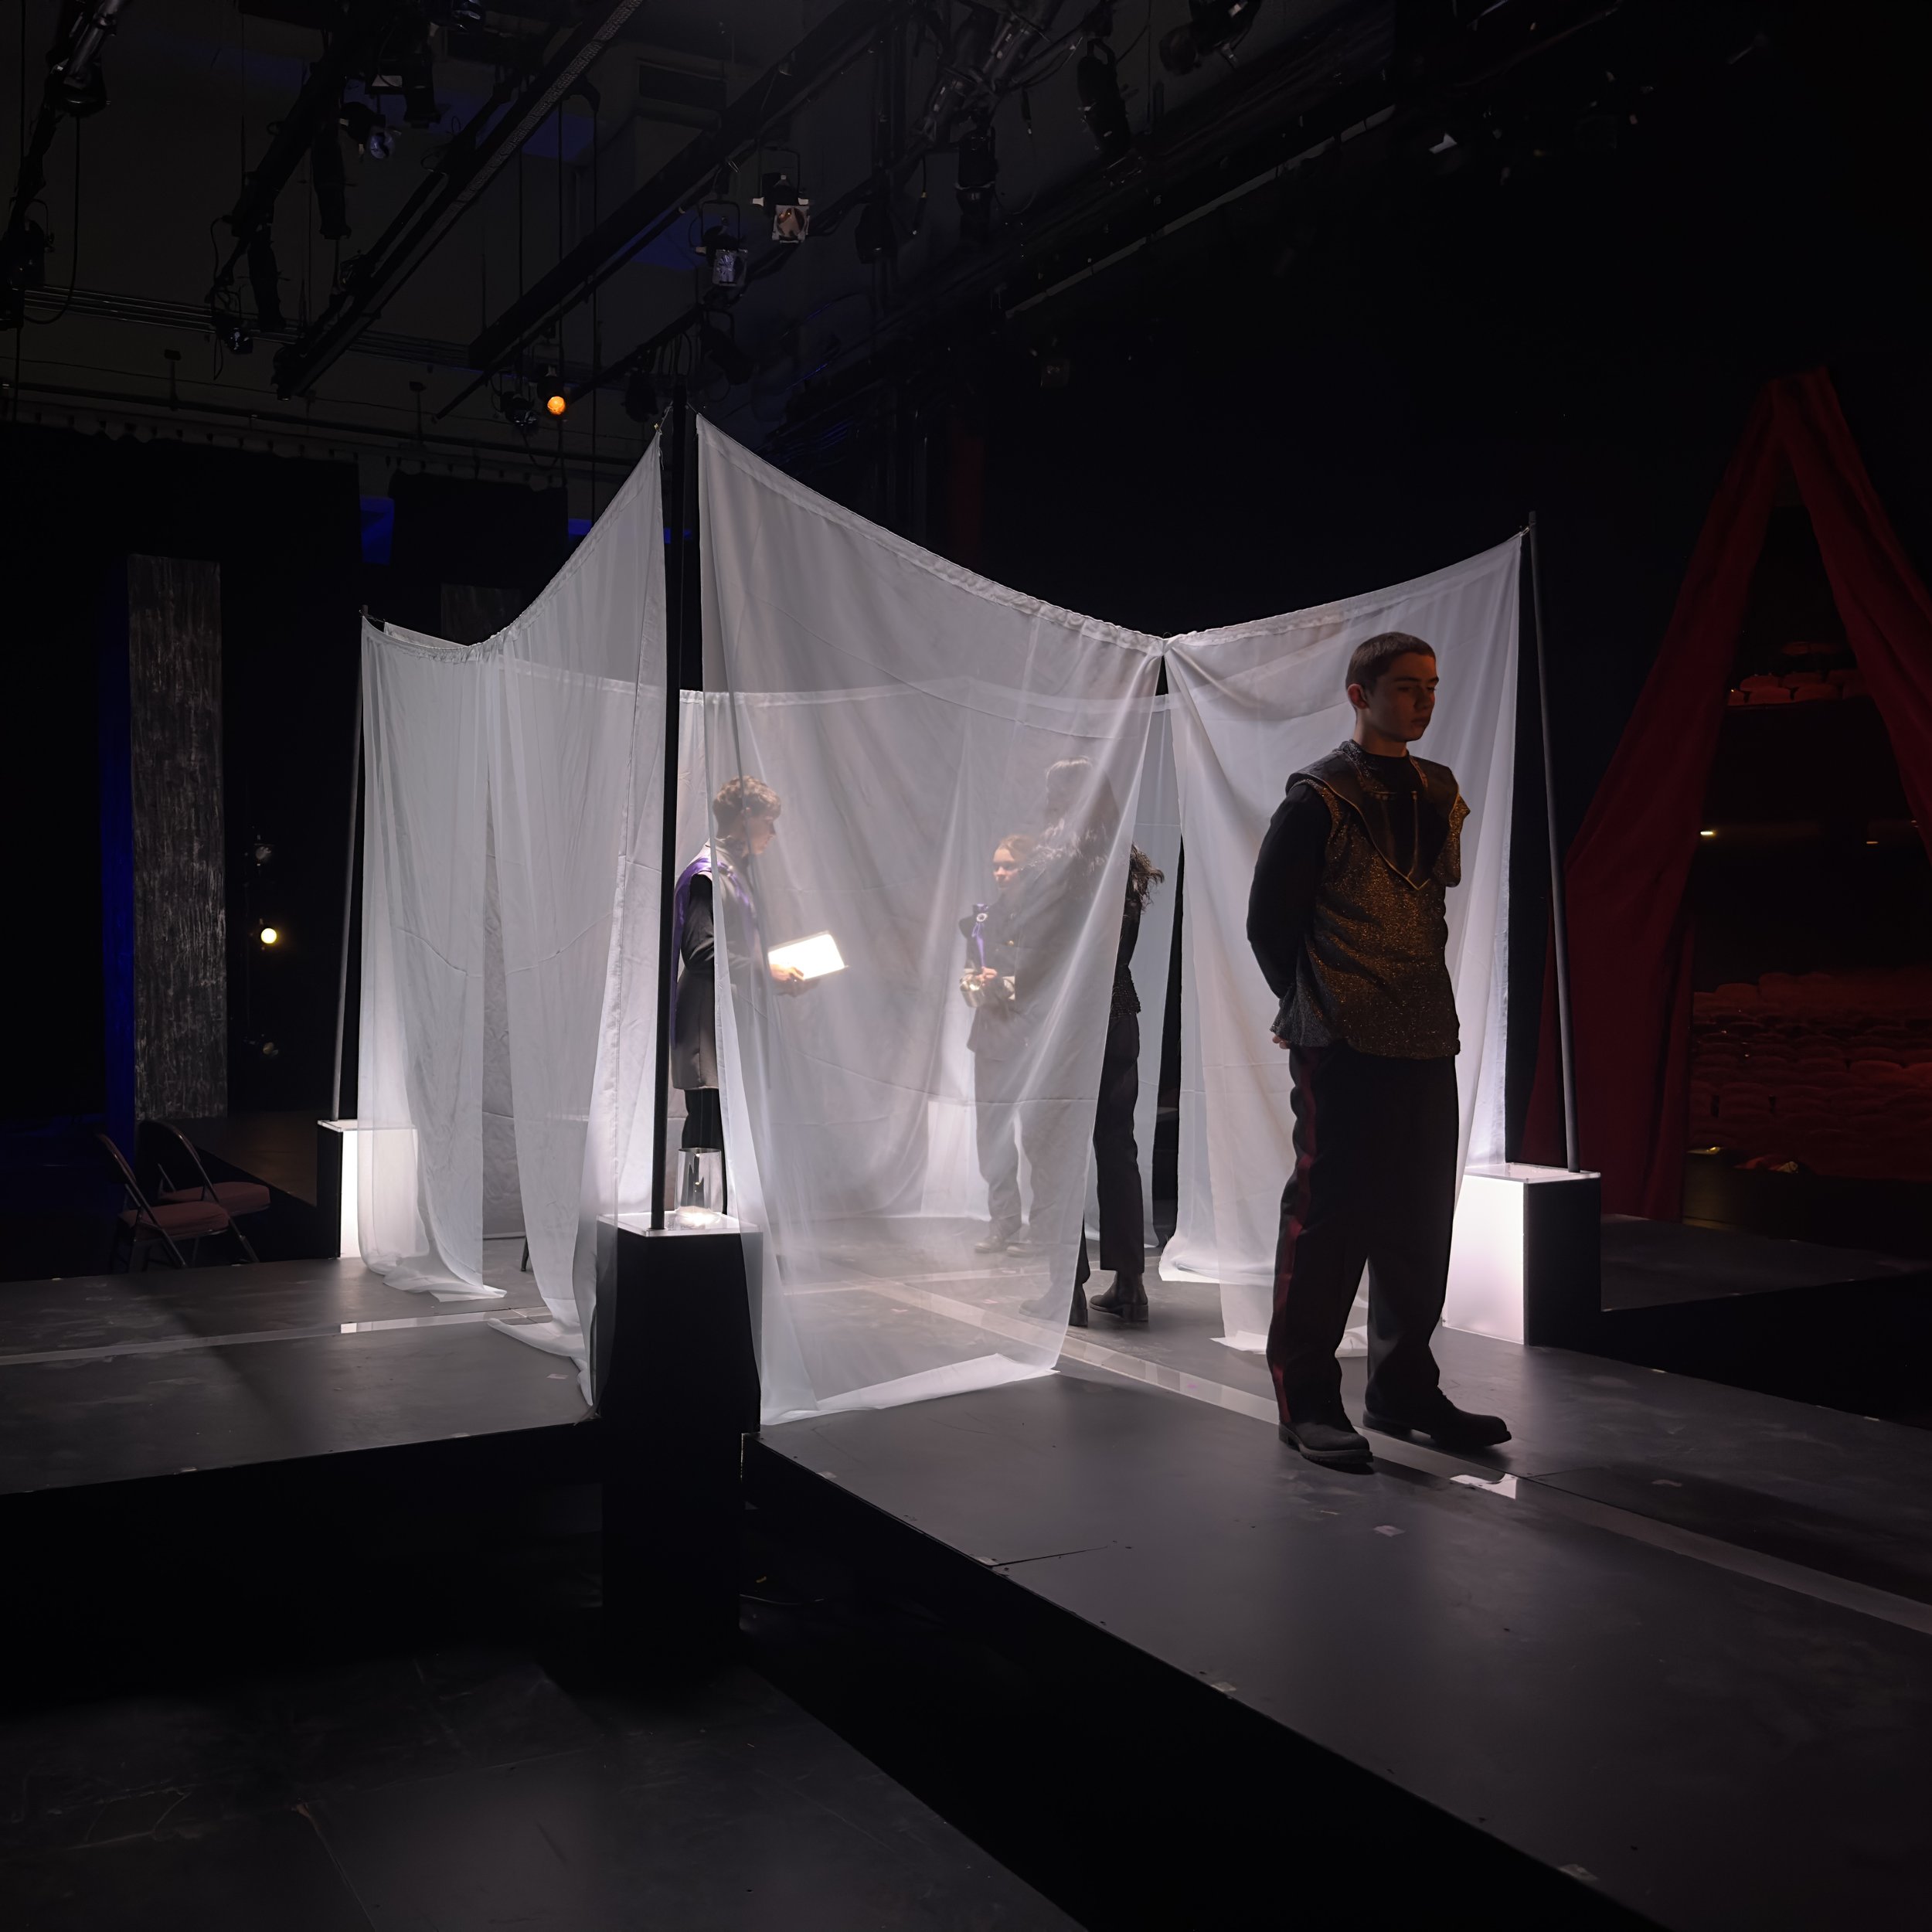
Prologue: Conspirators revealed one by one. I had the electric start 2 feet above the actors' heads and then flown out to 10 feet above their heads as the lights were turning on. This expanded the diameter of the beam, further revealing the stage.

Act 1, Scene 2: The soothsayer gives Caesar his prophecy.

Act 1, Scene 2

Act 1, Scene 3: I lit the scene using two lights, both hung in the same spot. One was a gobo (Construction A) and one was a soft profile. By using these two types of lights, I was able to make the actors visible while adding night-time texture. Additionally, a transparent roof was flown in above the scene, which I lit with a dim warm gobo.

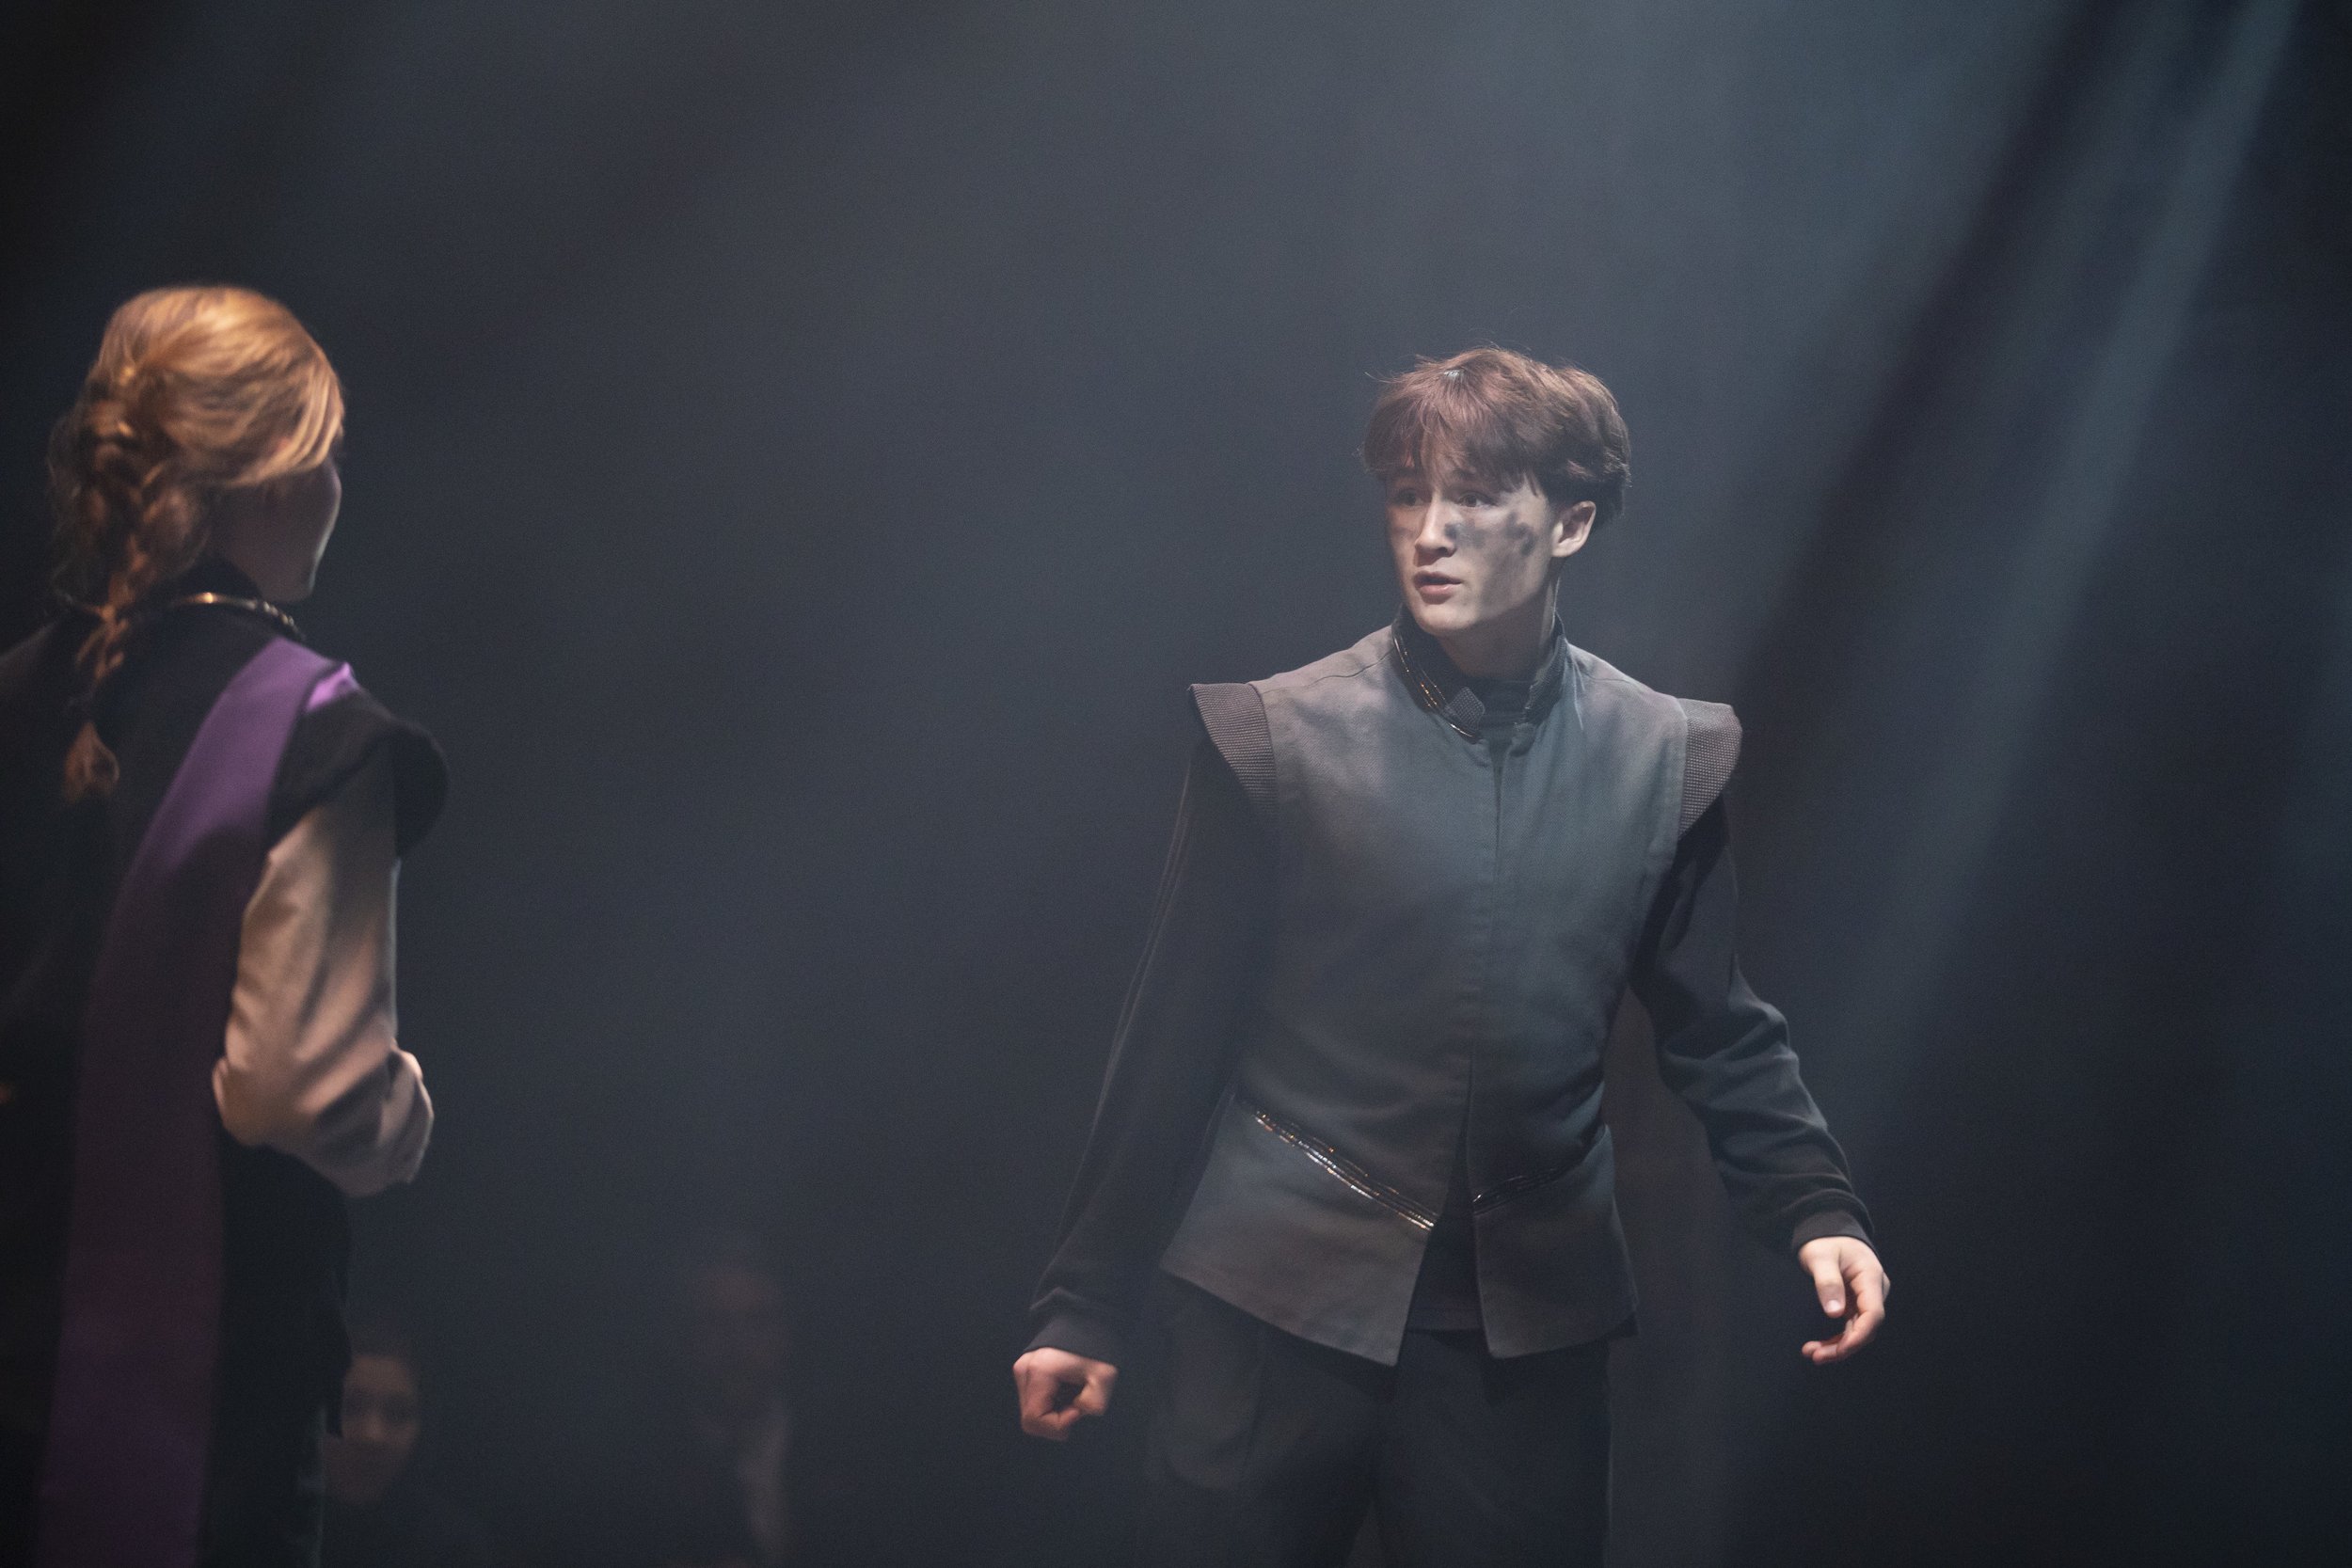
Act 2, Scene 1: The conspirators come up with their plan. Note the shadows under the actors eyes. This was intentional, created by using high-angle light.

Act 3, Scene 1: Caesar speaks before his death. Behind him, Casca prepares to stab him.

Act 3, Scene 1: Caesar is stabbed. This moment was lit heavily from below, using the LEDs embedded in the floor. I also put the Color Forces above the stage in a Perlin noise effect, creating moving and pulsing waves of red.
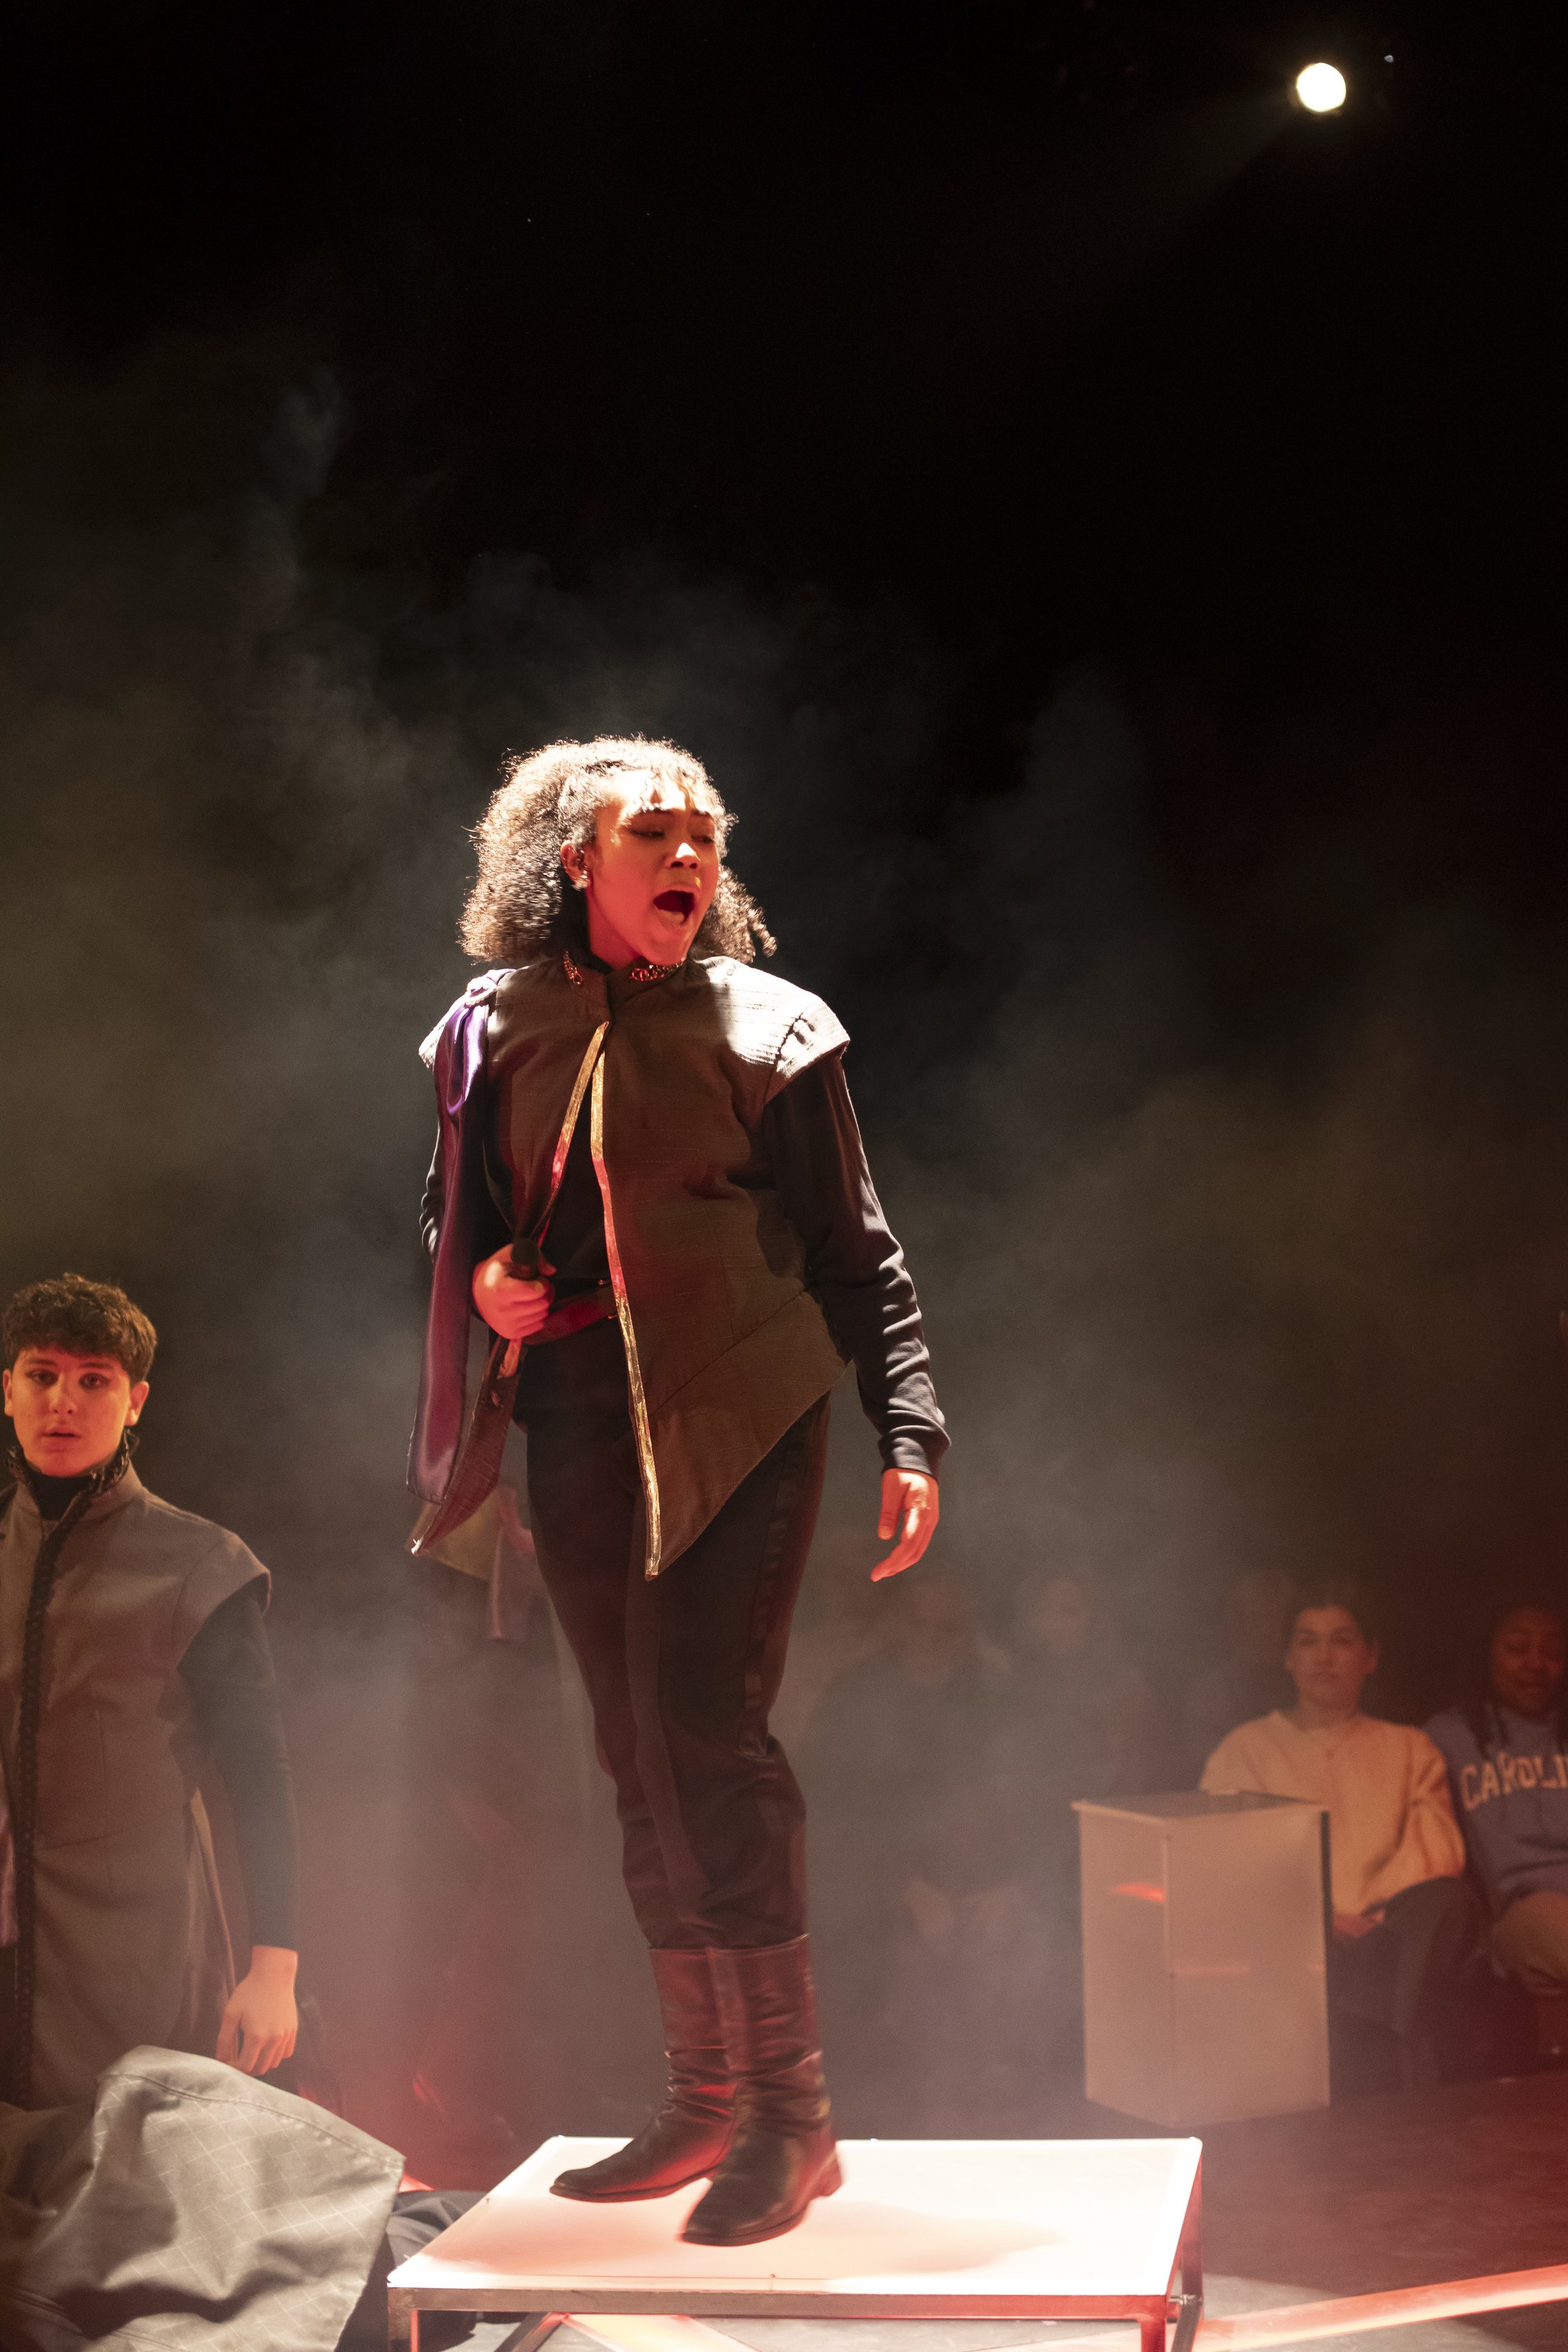
Act 3, Scene 1: Caesar is announced as dead. I used top lights to highlight the actor's hair and shoulders.

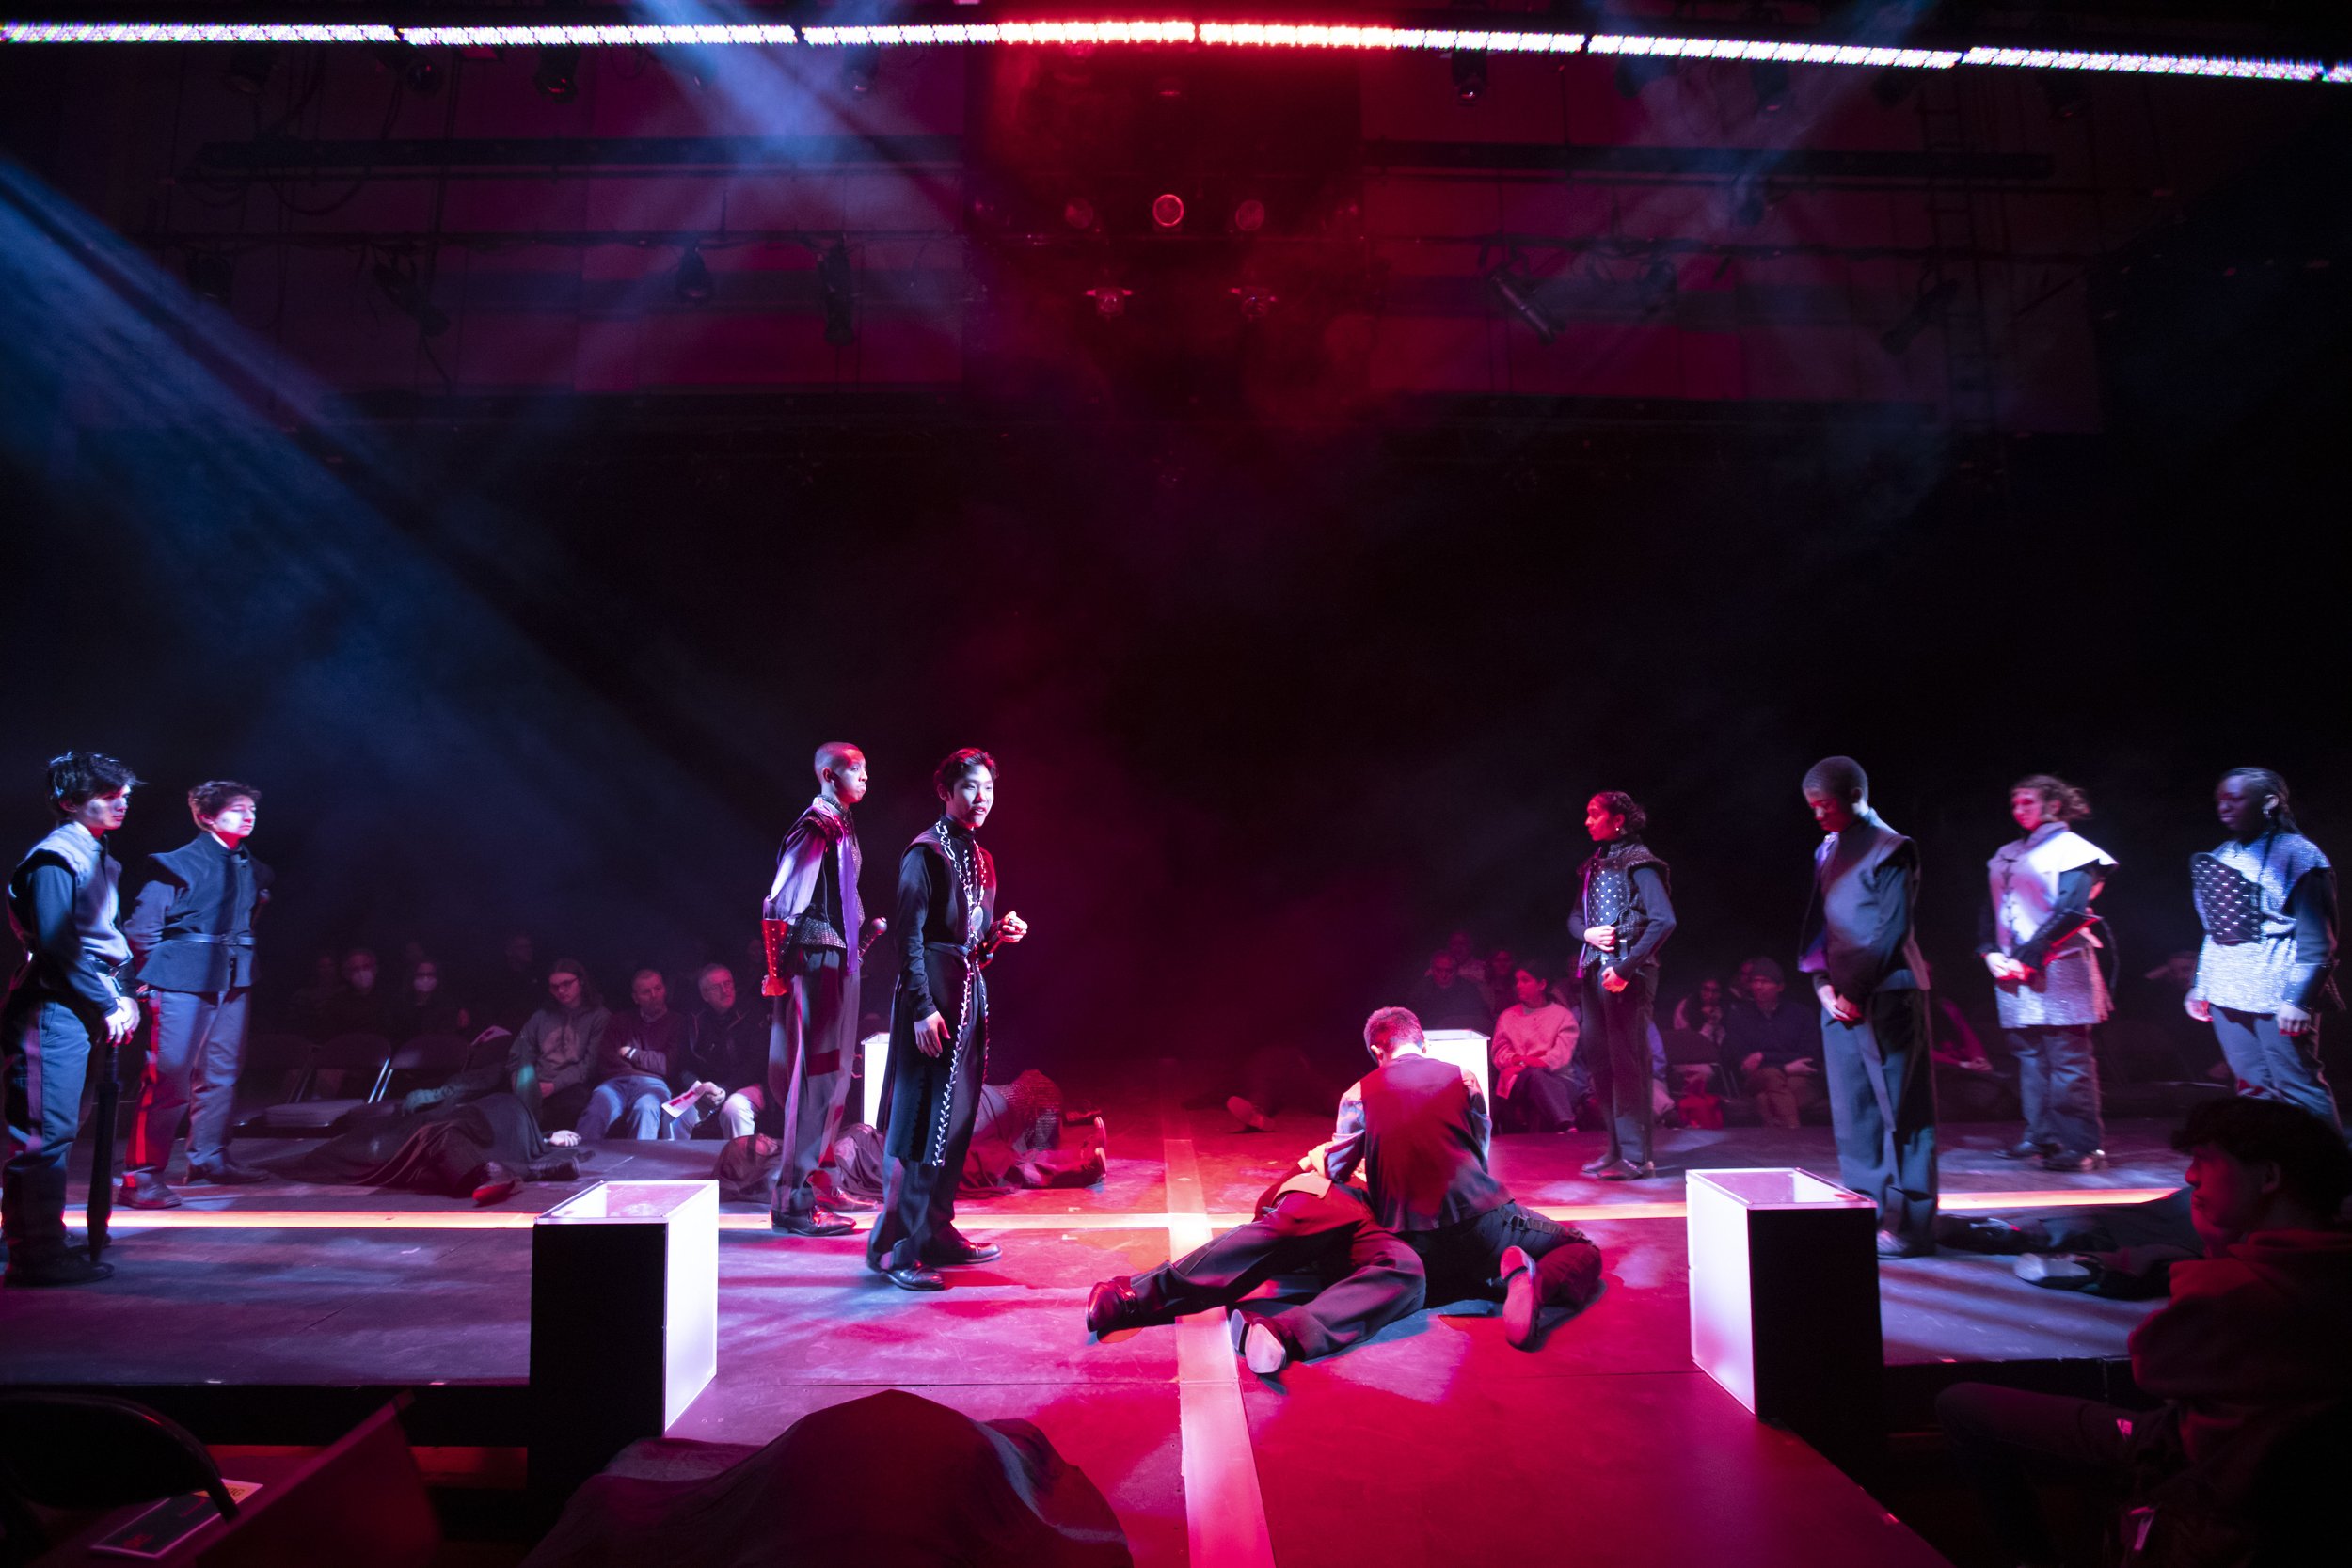
Act 3, Scene 2: The public listens to Mark Antony speak at Caesar's funeral. I used high-angle gobos and low-angle face-light to create a layered feel. The public was not the focus of this scene, so I used the gobos to light them while not drawing too much attention to them.

Mark Antony speaks with Octavius's messenger. I lit this scene with scattered red top light, which provided texture. I made this top light by freezing the Perlin noise effect generated earlier in the scene. After Caesar was stabbed, the effect gradually slowed down until it was static. I also used warm 30° face angle lights, and a single cool dance-style headlight on each side of the stage. I used the headlights to cast shadows of the actors onto the stage and contrast the deep reds. Additionally, I used mids and shins to give the actors a deep red silhouette.

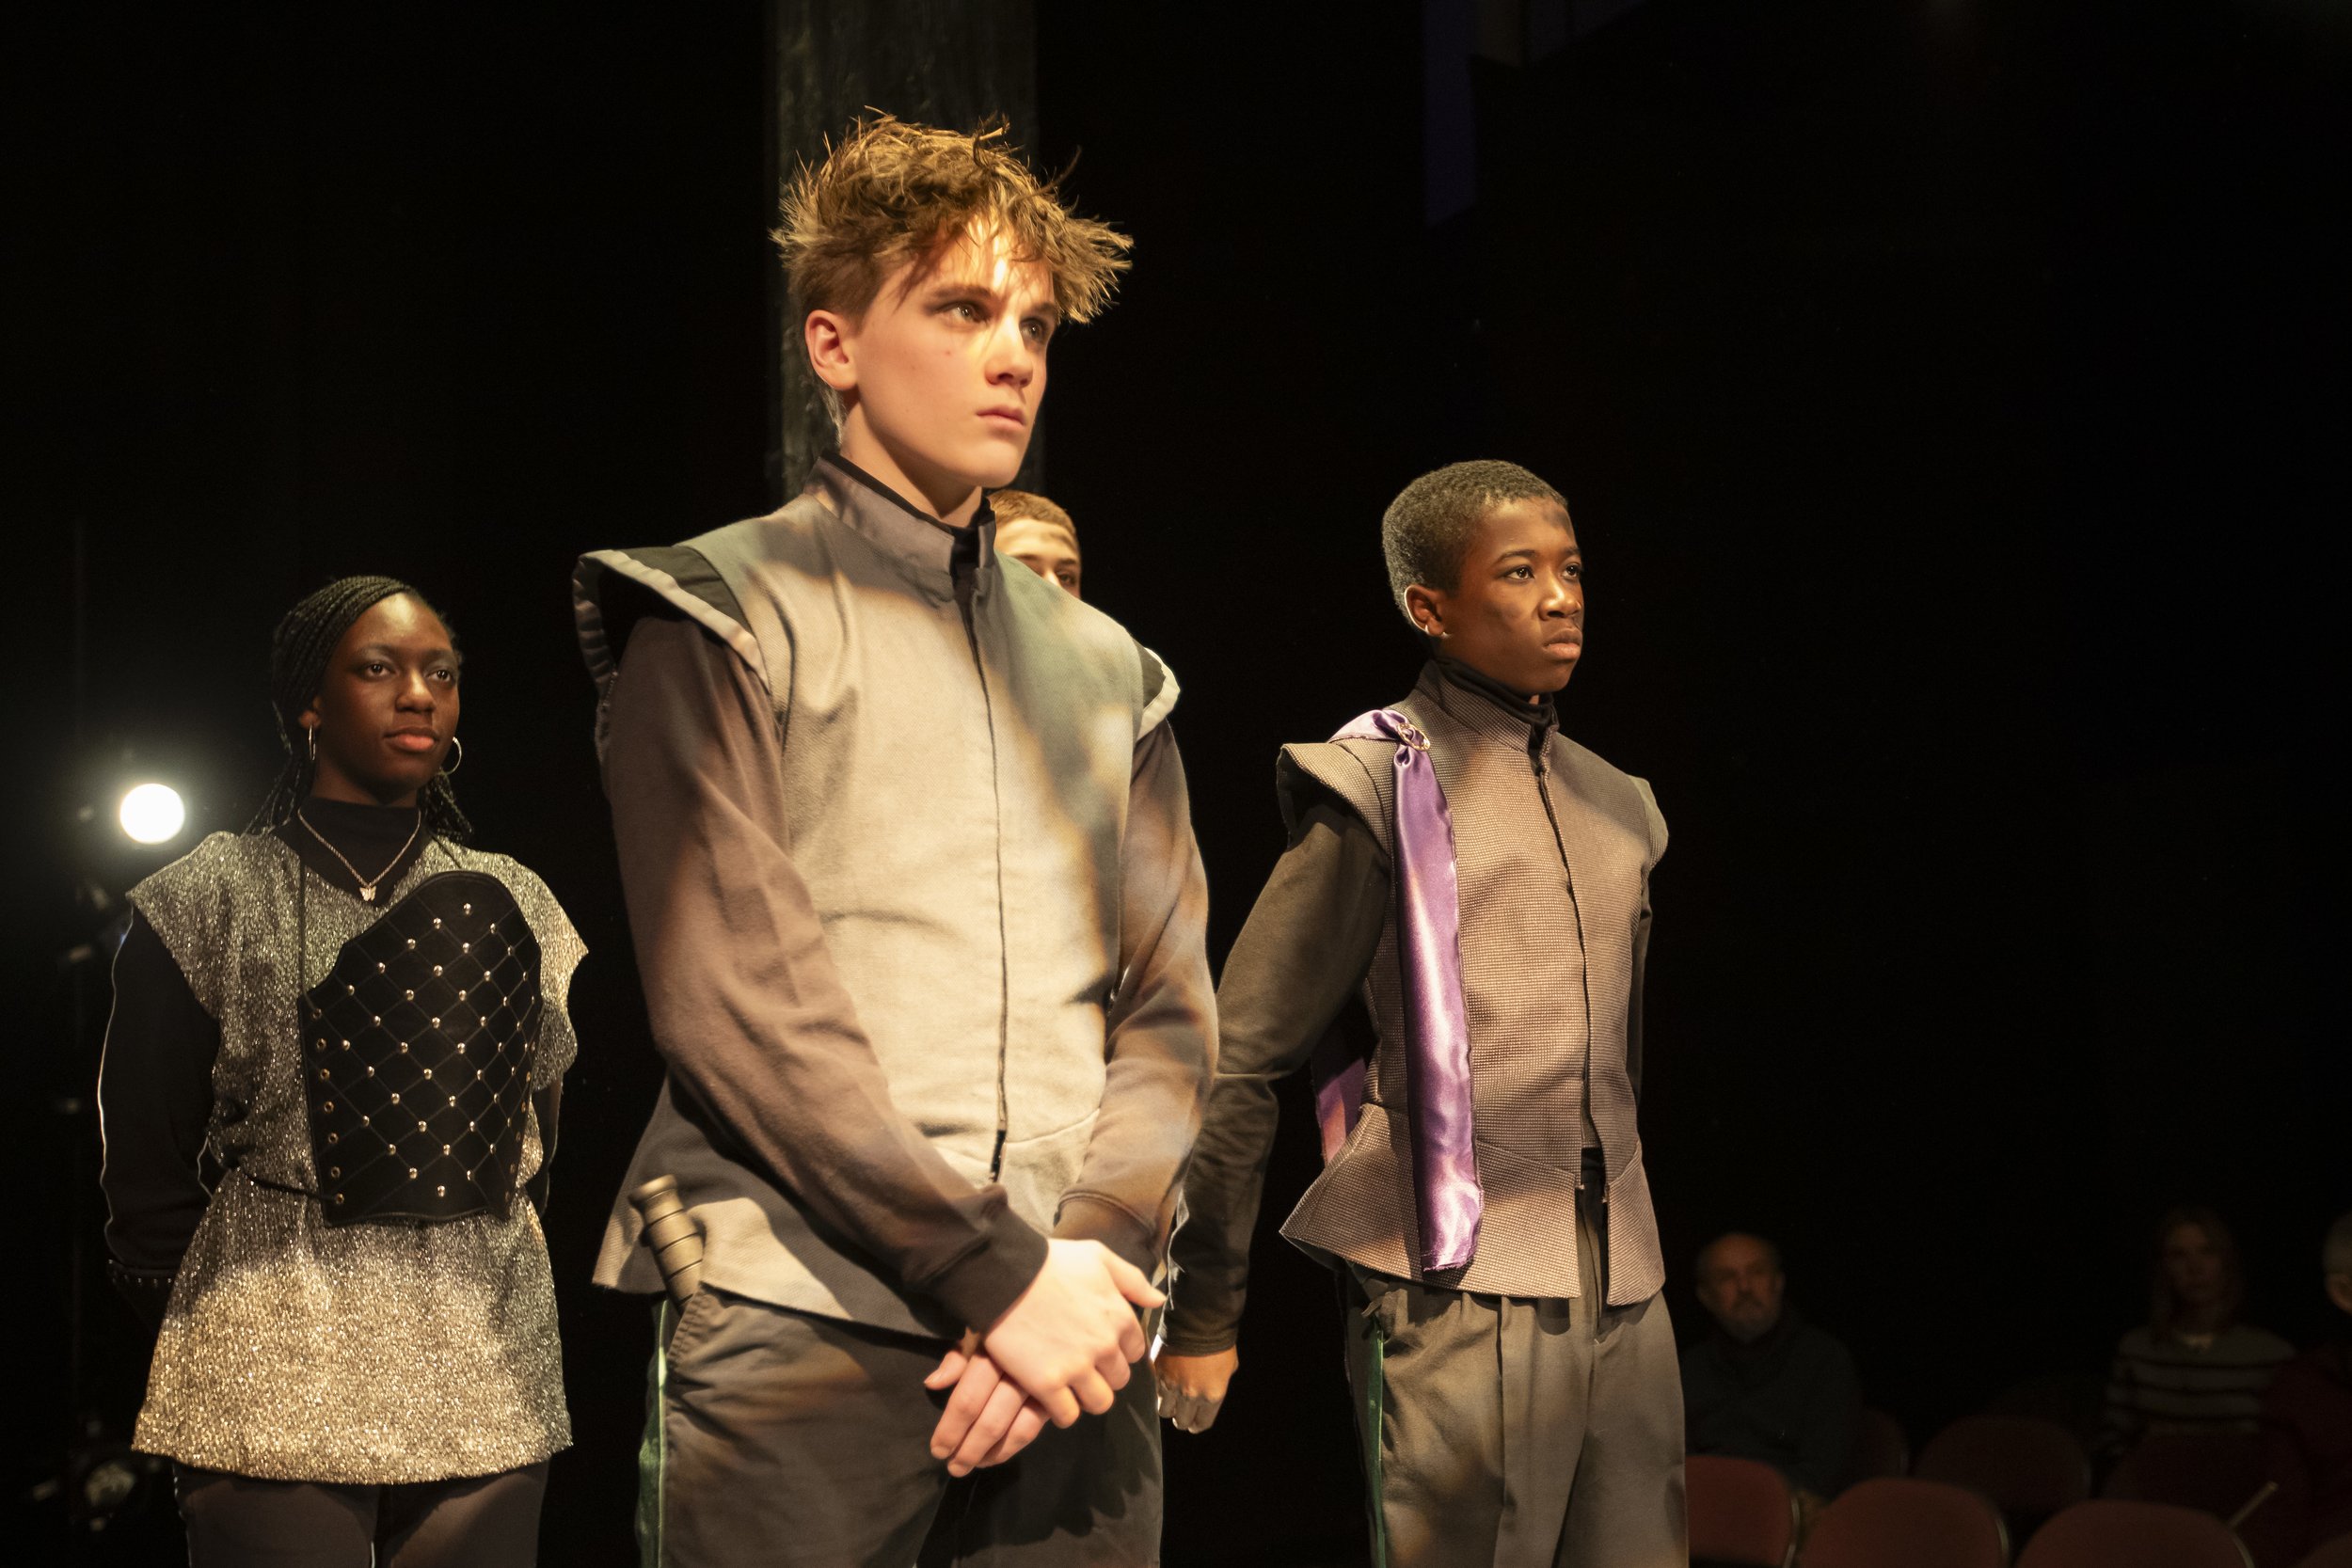
Act 4, Scene 1
Act 4, Scene 2
Act 4, Scene 3: A tent made of semi-transparent fabric was set up by stage crew in the middle of the stage. I lit this scene using a top light, as well as shin light coming from the four light boxes. Additionally, the guards posted outside of the tent were lit with warm gobos, which let the audience see their faces but kept them out of the focus. It also cast jagged lines on their figures, echoing the conflict happening inside the tent.

Act 5, Scene 1: The two sides confront each other. I used sharp gobos on the floor to not only provide texture and depth on the stage but also to further enforce the conflicted nature of the characters.

Act 5, Scene 3: The battle begins. Through the course of the battle scene, I shifted the color temperature and angle of the light to show that, while the scene was only a minute long, it occurred over the course of a day. This photo was taken towards the beginning of the battle. The stark-white up light from the floor contrasted with the low-angle sunrise warm tones.

Act 5, Scene 3: The battle continues. Later in the battle, I removed the warmth of the sunrise. I lit the scene with seven 2,000 watt fresnels, all hung in the same spot, as well as with cool mid lights. The fresnels created a cool daylight effect. By using these two very different angles, I highlighted the contours of the actors' body as they moved through the extremely physical fight choreography.
Act 5, Scene 4: Cassius asks Pindarus to kill him.

Act 5, Scene 5: Soldiers reflect on the battle, their shadows cast across the stage. This was the first time I put the dance-style side lights at full brightness. The brightness of the cool head light cast long shadows of the actors' bodies across the stage. I also used soft red top light, which echoed the destruction of the battle.
Act 5, Scene 5: Final moment of the show; Brutus lies dead in the middle of the stage. This photo shows the stretch of linear lighting I hung above the stage. Here, I used it to wash most of the stage in a cool white light while highlighting the death in the middle in red. I also used cool gobos to cut through the air, helping to fill the area above the stage.
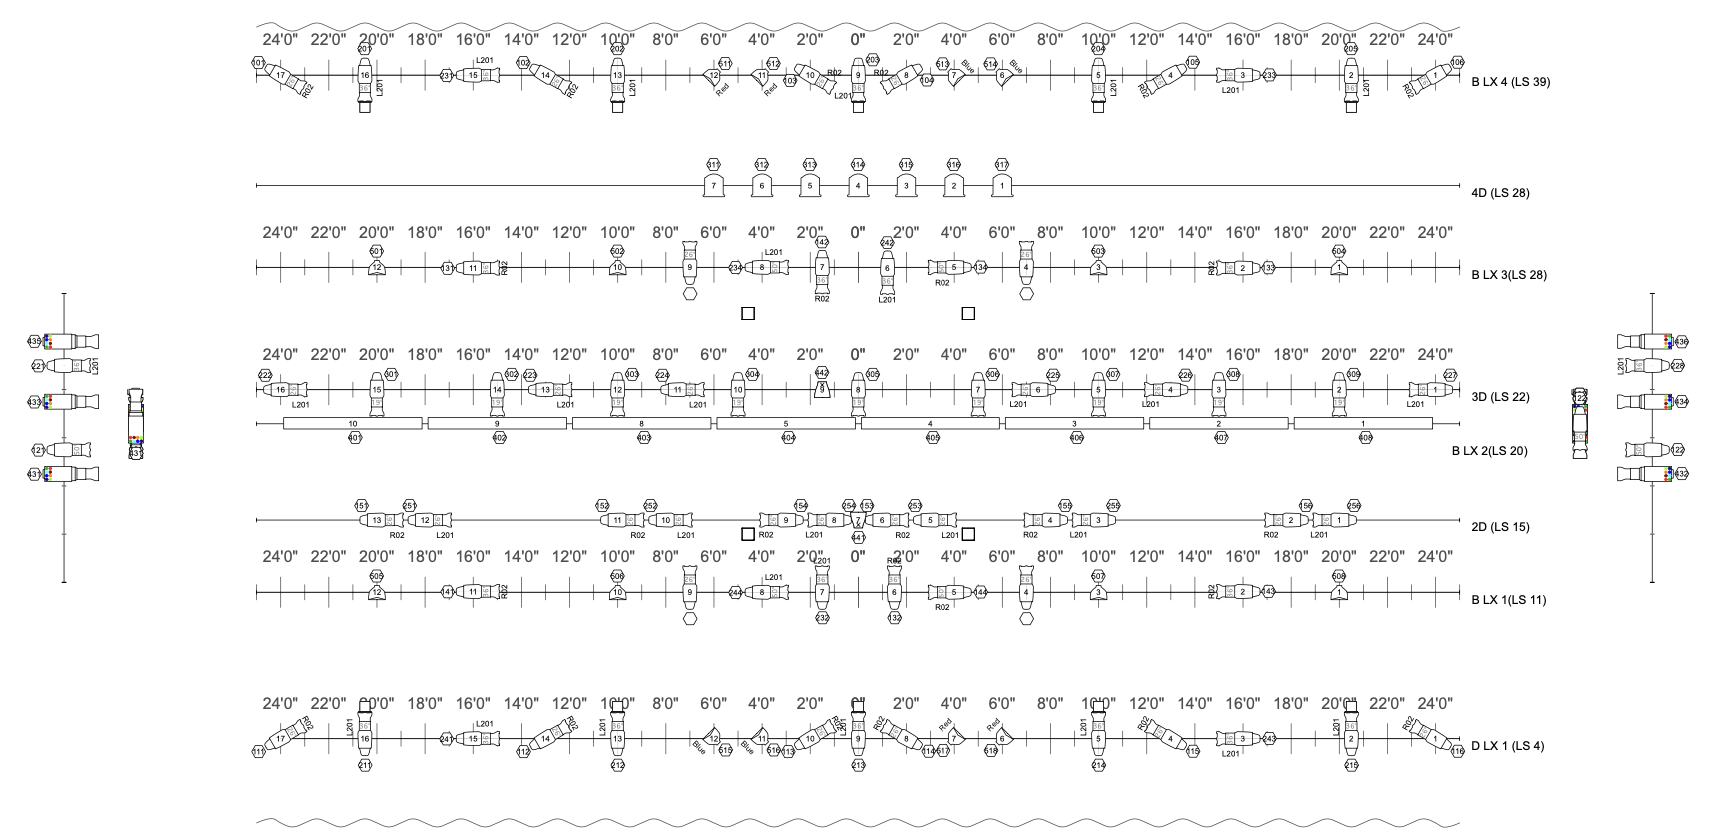
This is my final lighting plot for the show. Click for PDF download of full plot.

These are my hand-drawn drafts of lightings plots I did to help me visualize how to design for the round. Click for a PDF.

This is a photo of the magic sheet I used to program the show. It gave me easy access to all the fixtures and color palettes, as well as a quick guide to the location of my zones. The magic sheet also gave me a more consistent way to program my pixel map. Additionally, I put my most used macros in the bottom right corner.